Reputation:
The easy method to detect circuit disconnection problem in laptop motherboard. This is the big issue that most of the laptop repair person facing and if you can't detect the problem, it leads to serious issue and may the laptop
never work. So, here I am going to explain the easiest way to solve the problem.
First of all, let me say that even a tiny device on the board cause inactivation in whole motherboard and remember that small Capacitor can make such issue but mostly problems occur on important parts of the motherboard devices, such as: IC controllers, capacitors, inductors, resistors and Gates.
Let's start with this question that how to detect circuit disconnection on the motherboard, if the laptop does not turn on and could not measure its voltage.
The simple and easy method is to use LED blue cable adaptor, in below photo you can see a LED blue cable adaptor.

When you connect the LED adaptor to the laptop, if the light turns off, you can understand that there is circuit disconnection on the motherboard.
Note: in this case, it's better not to use power supply because by importing the voltage to the laptop, you may harm other motherboard devices.
First step: before stepping towards motherboard laptop, check hardware inputs such as; USB, LAN and etc. May be these cables damaged which these things can inactivate motherboard too.
Second step, connect the LED adaptor to the laptop, while the LED turning off touch all the IC, if you got that it's hot, concentrate on that areas and check capacitors and inductors. After you get confident that they sound ok. Then go to IC, replace it and test again.
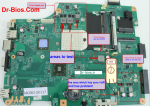
Third step is the important section of my explanation, so I am going to explain it with an example, for instance in Dell M5030 which I could not get a result. The important device is multimeter / ohmmeter; as you can see below:

As you see, check all those devices/inductors (PL) with multimeter. The black probe connected to ground and red one connected to PL. So, if the multimeter display the zero volt and create sound, so you have found the area problem but you could not find the specific device.
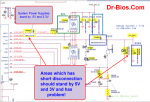
In this case, schematic helps a lot, let's see and find that area on its schematic:

Here it's clear the areas which 3 volt and 5 volt have disconnection problem. That area highlighted with yellow color.

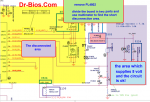
We can have close look on the schematic and zoom in that area and after omitting PL 4802. Divide the area in two parts as it's shown on the picture then test it with multimeter and find the problematic area.

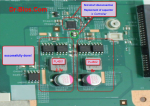
Now, the area in the schematic is clear and you have found the problematic device is a capacitor on the board that capacitor burned, which failed the whole motherboard function. So, you can change it and solve the problem.

never work. So, here I am going to explain the easiest way to solve the problem.
First of all, let me say that even a tiny device on the board cause inactivation in whole motherboard and remember that small Capacitor can make such issue but mostly problems occur on important parts of the motherboard devices, such as: IC controllers, capacitors, inductors, resistors and Gates.
Let's start with this question that how to detect circuit disconnection on the motherboard, if the laptop does not turn on and could not measure its voltage.
The simple and easy method is to use LED blue cable adaptor, in below photo you can see a LED blue cable adaptor.

When you connect the LED adaptor to the laptop, if the light turns off, you can understand that there is circuit disconnection on the motherboard.
Note: in this case, it's better not to use power supply because by importing the voltage to the laptop, you may harm other motherboard devices.
First step: before stepping towards motherboard laptop, check hardware inputs such as; USB, LAN and etc. May be these cables damaged which these things can inactivate motherboard too.
Second step, connect the LED adaptor to the laptop, while the LED turning off touch all the IC, if you got that it's hot, concentrate on that areas and check capacitors and inductors. After you get confident that they sound ok. Then go to IC, replace it and test again.
Third step is the important section of my explanation, so I am going to explain it with an example, for instance in Dell M5030 which I could not get a result. The important device is multimeter / ohmmeter; as you can see below:

As you see, check all those devices/inductors (PL) with multimeter. The black probe connected to ground and red one connected to PL. So, if the multimeter display the zero volt and create sound, so you have found the area problem but you could not find the specific device.
In this case, schematic helps a lot, let's see and find that area on its schematic:

Here it's clear the areas which 3 volt and 5 volt have disconnection problem. That area highlighted with yellow color.

We can have close look on the schematic and zoom in that area and after omitting PL 4802. Divide the area in two parts as it's shown on the picture then test it with multimeter and find the problematic area.

Now, the area in the schematic is clear and you have found the problematic device is a capacitor on the board that capacitor burned, which failed the whole motherboard function. So, you can change it and solve the problem.

